
Ok so you’ve been a user of WordPress.com for a while now. Things have been pretty nice so far, but you’ve come to a point where you’re ready to go beyond WordPress.com. You want to install plugins and customize your themes. You want to really start monetizing your site and be in full control. Well you are at the right place.
While today’s article won’t discuss the differences between WordPress.com and WordPress.org, we will take a look at a question that a lot of users have been asking us: how to move your existing WordPress.com blog to a self-hosted WordPress.org site. In this step by step tutorial, we will show you how to properly move your blog from WordPress.com to WordPress.org. We will cover how to transfer all of your WordPress.com content to a WordPress.org site (yes this include images). We will also cover how to keep all of your search engine rankings along with how to redirect your existing users to your new site. Are you ready? Let’s start transferring your WordPress.com blog over to your new self-hosted site.
Things You Need Before You Start
You will need to have a domain name and a good web hosting company that knows WordPress. We highly recommend that you use Bluehost because they will give you a free domain and 50% off their hosting plan (special for WPBeginner users).Bluehost is also an officially recommended hosting provider of WordPress.
If your WordPress site already has a custom domain name, then don’t worry. We will cover that as well. Lastly, you will need access to your WordPress.com account, so you can easily move all of your posts, pages, images, comments, and other data over to your self-hosted WordPress site.
Before you get started with this migration tutorial, we want to let you know that we can migrate your site for FREE as part of our Free WordPress Blog setup service.
Step 1: Exporting Data from WordPress.com
Sign in to your WordPress.com account and go to your blog’s Dashboard. Click on Export under Tools menu.
Clicking on the Export tool will take you to a new page where you will be asked to choose between Free or Guided Transfer.
Choose the Free option by clicking on Export. On the next screen you will be asked which data you want to export. Select “All Content” and press the Download Export File button. An XML file will be downloaded in your computer which will contain all of your posts, pages, images, comments, custom fields, categories, tags, navigation menus and other information.
Step 2: Setting up WordPress
Now that you have exported your WordPress.com data, the next step is to set up a fresh WordPress install on your web hosting. WordPress is very easy to install, and it only takes a few clicks. We have a step-by-step tutorial on how to install WordPress within 5 minutes. Once you have installed WordPress, it is time to import your content into your new self-hosted WordPress website.
Step 3: Importing Content into Self Hosted WordPress Site
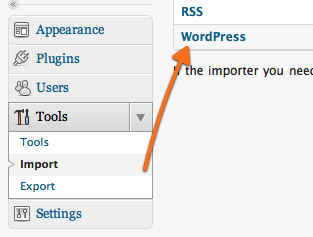
To import your old content from WordPress.com to your new site, you need to click on Tools » Import option in your self-hosted WordPress.org dashboard.
Next click on WordPress. You will be asked to install the WordPress Importerplugin. Once you install it, activate and run the importer plugin. It will take you to a screen where you will be asked to upload your WordPress.com XML file that you downloaded in step 1 of this tutorial.
Note: if your file size is larger than 2MB, then you have two options. One is to ask your web hosting company to increase that limit temporarily, so you can get on with the process. The other option would be to split your file by using a WXR file splitter.
When you start importing, you will have the option of assigning your old content to a current user or create a new user. You’ll also have the option of importing your old attachments (you want to make sure that you check this box to ensure that your images are imported).
If you took the optional step of exporting your old links/blogroll, then you should take this time to import them. The process is pretty much the same as above. Go to the Import page from the Tools tab, click on Blogroll, install the plugin, choose the location of the exported link/blogroll file and import it.
Step 4: Setting your WordPress.com blog to private
The final step would be to set your WordPress.com blog to private. If you don’t want to redirect your old users to your new site, then go ahead and follow this step. Go to the Reading page under Settings tab, from your WordPress.com Dashboard and select the last option, “I would like my blog to be private, visible only to users I choose”.
Attention: If you have been writing for sometime, and you have a loyal audience, then it does not make sense to leave them hanging. Furthermore, if your blog has been out there for a while, then chances are that it is indexed in Google and other search engines. You should keep all the search engine juice and easily redirect your old users to your new blog.
Step 5: Redirecting Visitors and Preserving SEO
Redirecting users to new location with a 301 header is the standard solution to keep search rankings while moving a site from one location to another. Since you don’t have access to .htaccess on WordPress.com, you can not make any changes by yourself to retain search engine rankings. However, WordPress.com offers a paid upgrade, Offsite Redirect, which provide this functionality. Go to WordPress.com blog’s dashboard and click on the Store menu item. The upgrade you are looking for is called Offsite Redirect. At the time of writing this tutorial, this update was reasonably priced at $13 USD per year. This upgrade provides 301 redirect which allows your site’s visitors and search engines to be automatically redirected to your new site.
Some of you will ask how long should I keep paying for this Offsite redirect feature? The answer is for as long as you want to. However, we personally think that 2 years would be enough time for your old users to memorize your new domain name

If you are changing domains, then another thing you want to do is update all in post URLs. If you ever inter-linked your posts, then those links have to be updated.
Frequently Asked Questions (FAQs)
We wrote this article in January 2013 and since then we’ve received tons of great questions. A lot of which we’ve answered via email or in comments, so thought it would be nice to compile it at one place where everyone can see them.
What happens with my WordPress.com Subscribers?
Thankfully, WordPress.com allows you to migrate your subscribers with one condition. You must use Jetpack plugin which adds the same subscribe functionality that you had at WordPress.com. Once you install and activate the Jetpack plugin, you would need to contact the WordPress.com team and ask them to migrate the subscribers for you. Our hope is that in the later versions of Jetpack, this will become easier and users will be able to do it themselves.
Can you help me transfer from WordPress.com to WordPress.org for FREE?
Absolutely. We offer migration from WordPress.com as part of our free WordPress blog setup service. If you need our assistance, then simply signup. It’s free
What are the costs of switching to WordPress.org?
WordPress is free. However, there are some minimal web hosting costs. We recommend that you read this article on: Why is WordPress free? What are the costs and what is the catch?
Will my images break?
No they will not. When you transfer using the import file, all attached images are downloaded and the link is updated. However there is one caveat that we noticed. If your image URL starts with files.wordpress.com, then they will not be converted. If you notice that the image URL has not changed and still points to WordPress.com, then we recommend that you use import external images plugin, and it will take care of that.
I registered my domain through WordPress.com, can I still move?
Yes you can. WordPress believe in empowering users and giving them full control of their content. If you already have a domain name through WordPress.com, then all you need is a web hosting account. We recommend that you setup with Bluehost or any of these other WordPress hosting providers. During the signup phase, you will be asked do you have a domain or want to register a new one. Simply select the option that I have a domain name, and insert the domain that you registered at WordPress.com. Next thing you would have to do is change the nameservers to point to the hosting provider. We’re able to assist with this as part of our free setups service. You can also ask your web hosting provider for support.
Will my website go down when I switch?
If you do it correctly, then NO. The method we’ve suggested above will ensure that your website never goes down. If you’re worried, then know that we are here to help. You’re welcome to use our free setups service at anytime.
We hope that you found our guide on switching from WordPress.com to self-hosted WordPress.org to be helpful. If you have any questions, then please let us know by leaving a comment below.







.jpg)


